- The Agile Coach
- Agile Manifesto
Agile project management
- Overview
- Project management intro
- Workflow
- Epics, stories, themes
- Epics
- User Stories
- Estimation
- Metrics
- Gantt chart
- Program management vs. project management
- Project baseline
- Continuous improvement
- Lean principles
- 3 pillars of Scrum
- Scrum Board
- Waterfall Methodology
- Velocity in Scrum
- What is Definition of Ready
- Lean vs. agile
- Scrumban
- Lean Methodology
- Sprint backlog
- Burn up chart
- 4 kanban principles
- 4 kanban metrics
- Program vs. Project Manager
- Gantt chart examples
- Definition of done
- Backlog grooming
- Lean process improvement
- Backlog refinement meetings
- Scrum values
- Scope of work
- Scrum tools
- Tools
- Workflow automation software
- Templates
- Task tracker
- Workflow automation
- Status report
- Workflow chart
- Project roadmap
- Project schedule
- Tracking software
- Roadmap tools
- Technology roadmap
- Project scheduling software
- Backlog management tools
- Understanding workflow management strategies
- Workflow examples
- Create project roadmap
- Sprint planning tools
- Sprint demo
- Project Timeline Software
- Top task management tools
- Product backlog vs. sprint backlog
- Top workflow management tools
- Project dependencies
- Task dashboard guide
- Sprint cadence
- Fast tracking
Product Management
- Overview
- Product Roadmaps
- Product Manager
- Tips for new product managers
- Roadmaps
- Tips for presenting product roadmaps
- Requirements
- Product analytics
- Product development
- Remote product management
- Minimal viable product
- Product discovery
- Product specification
- Product development strategy
- Product development software
- New product development process
- Product management KPIs
- Net Promoter Score (NPS)
- Product critique
- Prioritization frameworks
- Product features
- Product management tools
- Product Lifecycle Management
- 9 best roadmap software for teams
- Product launch checklist
- Product strategy
- Product engineering
- Product operations
- Portfolio management
- AI and product management
- Growth product management
- Product metrics
- Product release
- Feature request
- Product launch
- Product planning
- Product launch event
- Value Stream Management
- DevOps
Agile tutorials
- Overview
- Jira and Confluence sprint refinement
- How to do scrum with Jira
- Learn kanban with Jira
- Learn how to use Epics in Jira
- Learn how to create an agile board in Jira
- Learn how to use sprints in Jira
- Learn Versions with Jira
- Learn Issues with Jira
- Learn burndown charts with Jira
- Auto-create sub-tasks and update fields in Jira
- How to automatically assign issues with Jira Automation
- How to sync epics stories with Jira Automation
- Automatically escalate overdue issues in Jira
About the Agile Coach
- All articles
Learn versions with Jira
The guide to using versions in Jira

By Max Rehkopf
By Max Rehkopf
As a self-proclaimed “chaos muppet” I look to agile practices and lean principles to bring order to my everyday. It’s a joy of mine to share these lessons with others through the many articles, talks, and videos I make for Atlassian
Get started for free with Jira
Jira Versions Tutorial
In this tutorial, we'll explain how to work with versions in Jira.
TIME
10 minute read. Complete over 2 weeks or more.
AUDIENCE
You're familiar with how Scrum and/or Kanban work in Jira
You have the Administer Projects permission for all projects on your Scrum or Kanban board. See Managing project permissions for more info.
PREREQUISITE
You've created a Jira account
You've created a Jira Scrum or Kanban project
You've filled your project with issues
You’ve enabled the Releases feature under your Project settings
What is a version in Jira?
In Jira, versions represent points-in-time for a project. They help you organize your work by giving you milestones to aim for. You can assign issues in your project to a specific version, and organize your sprints around completing work in that version.
Step 1: Create a version in Jira
Navigate to your project.
In the project menu, click on Releases.
Click on Create version.
Select the Name text box and enter a name. Optionally, schedule a Start date and/or Release date, or add a Description of this version. Click Save.Version names are typically numeric, for example, 1.0 or 2.1.1. You could also consider using an internal codename.
How many versions should I create?
You can create as many as you think is necessary. For example, you might create several versions, to plan ahead. Or you might just have one or two versions for now.
Once you create a version, the Affects version and Fix version fields will become available on your issues.
Affects version is the version in which a bug or problem was found. Although it can be useful for tracking problems, it isn't used very often in Jira.
Fix version is the version where you plan on releasing a feature or bugfix to customers. This field is used for release planning, monitoring progress and velocity, and is used widely in reporting. This is most likely the field you want.
Step 2: Add issues to version
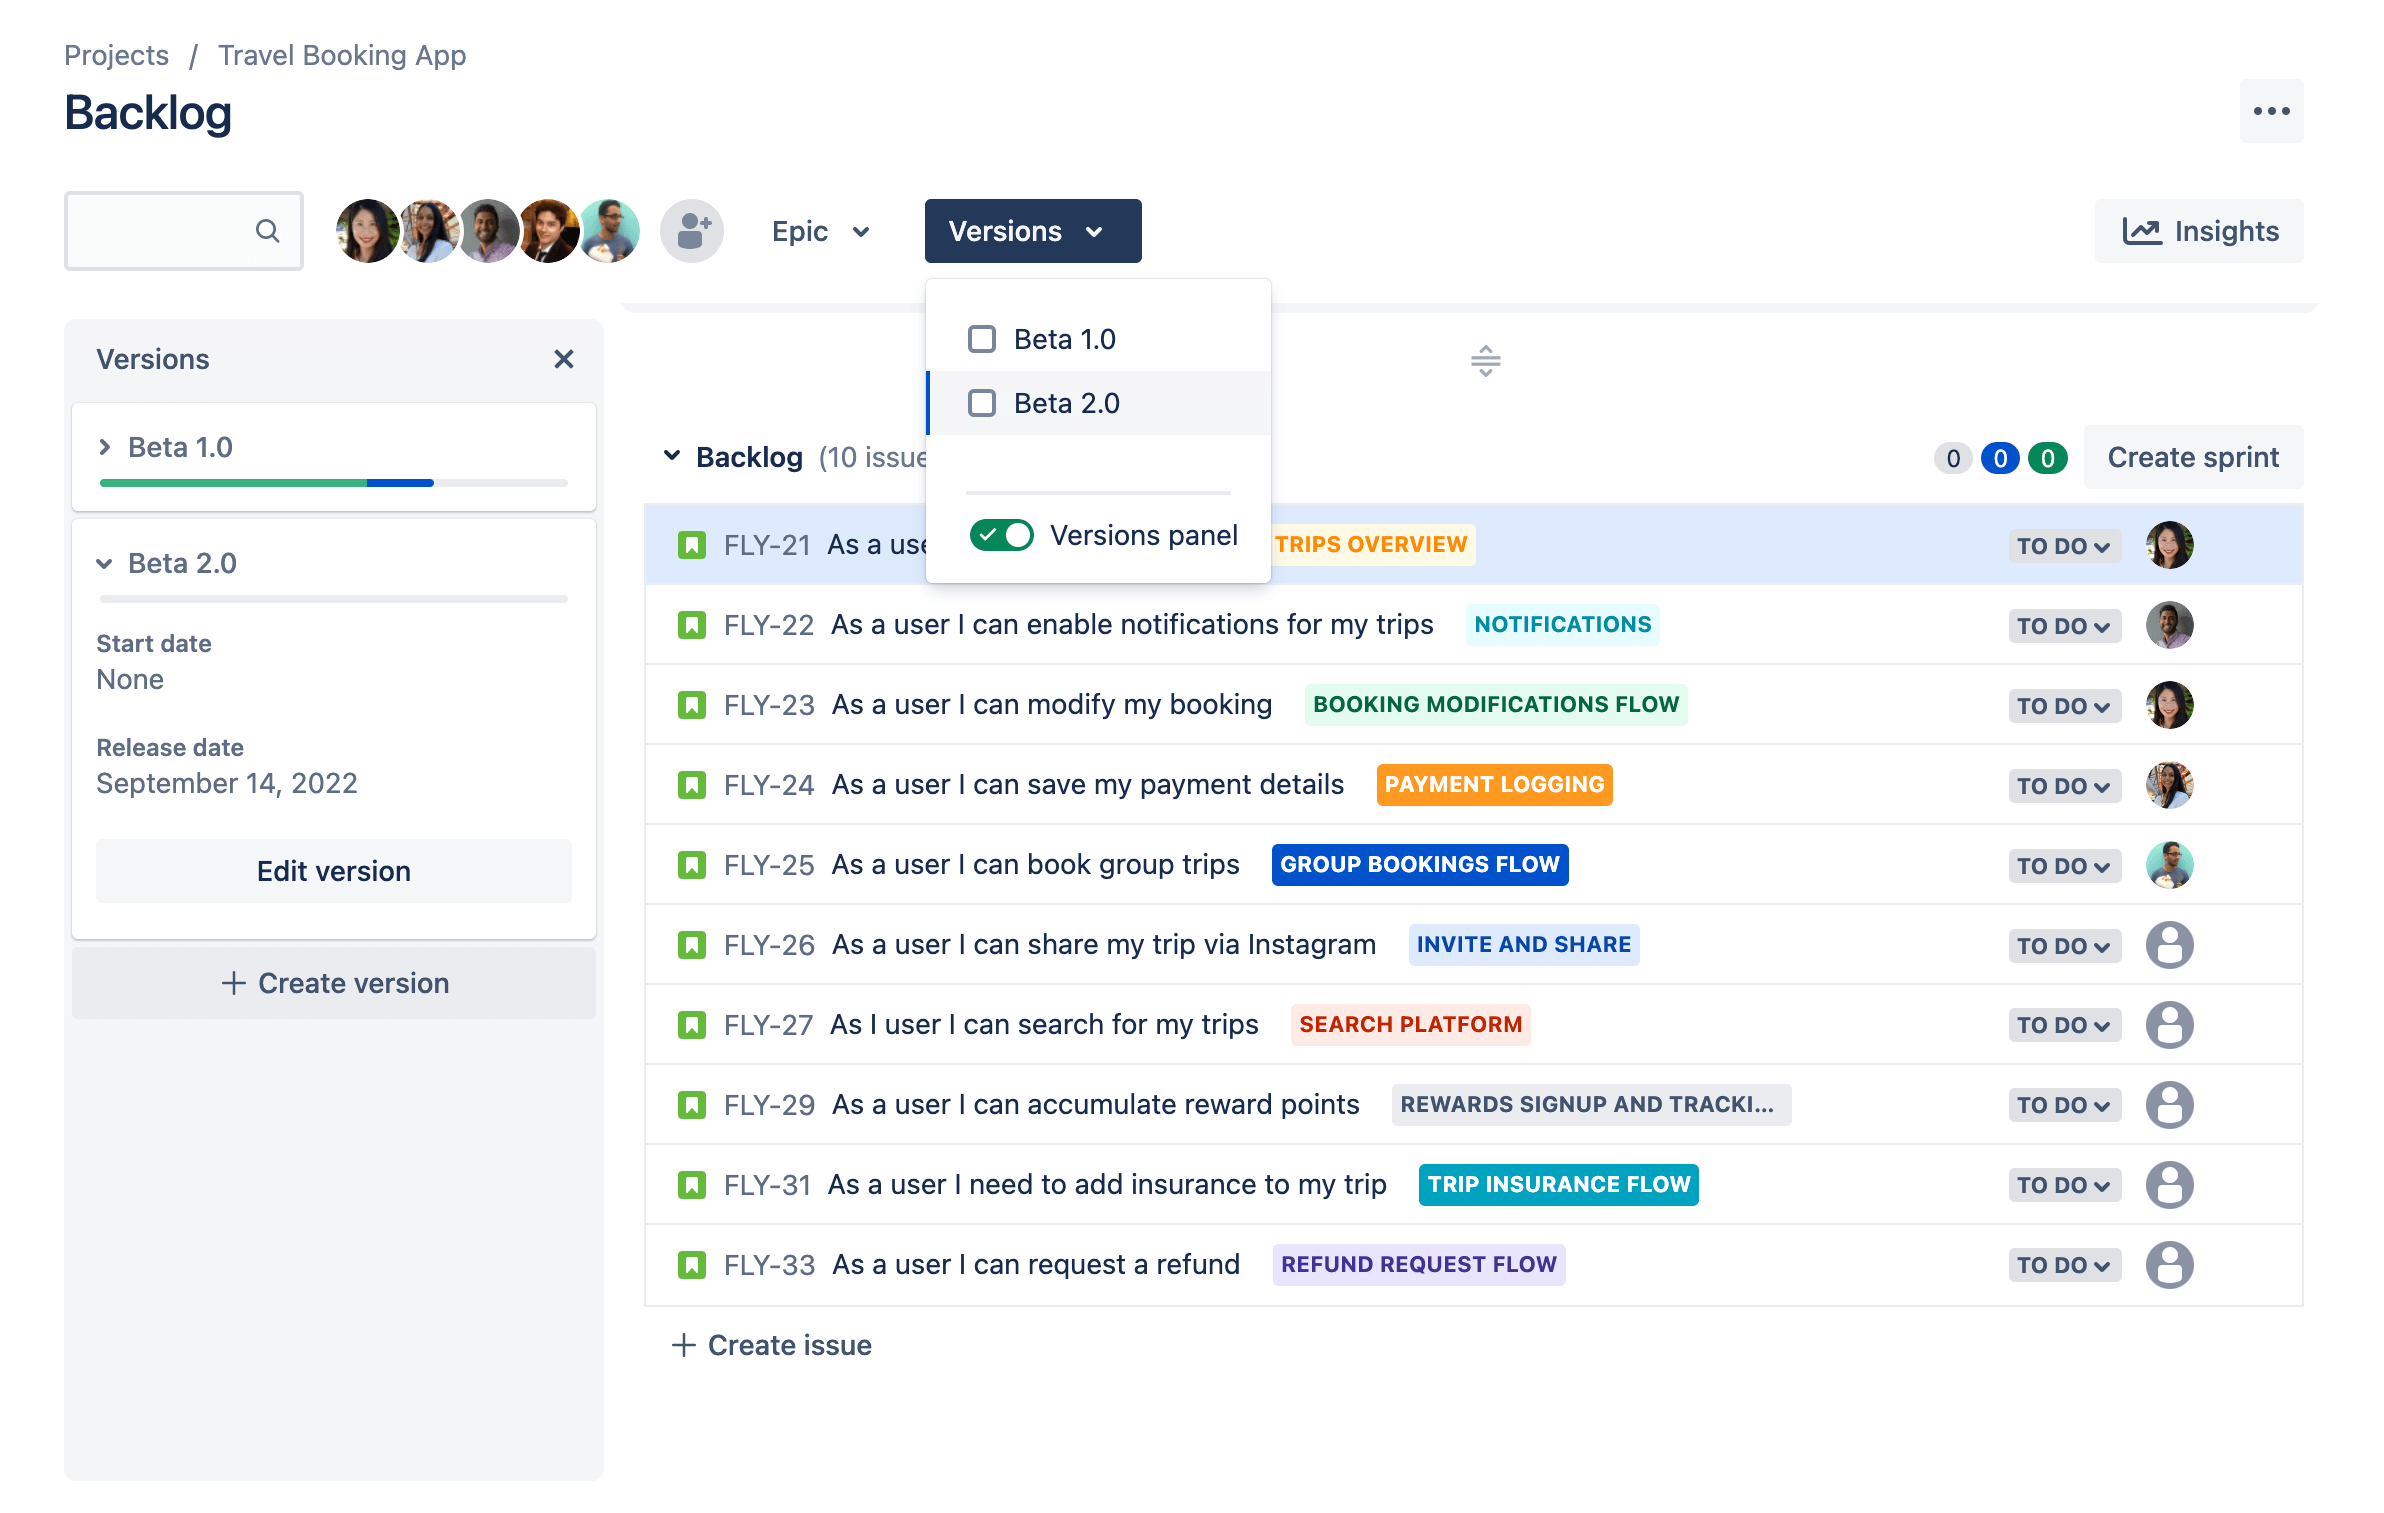
If your project has a backlog
Navigate to the project Backlog.
Open the Versions panel on the left.
Drag an issue to the version you want to add it to.
If your project doesn't have a backlog
Open the issue you want to add to a version.
Find the Fix version/s field, and enter the version you want to add the issue to.
Step 3: Monitoring the progress of a version
Jira gives you many tools you can use to check the progress of a version. We'll discuss a few of them here.
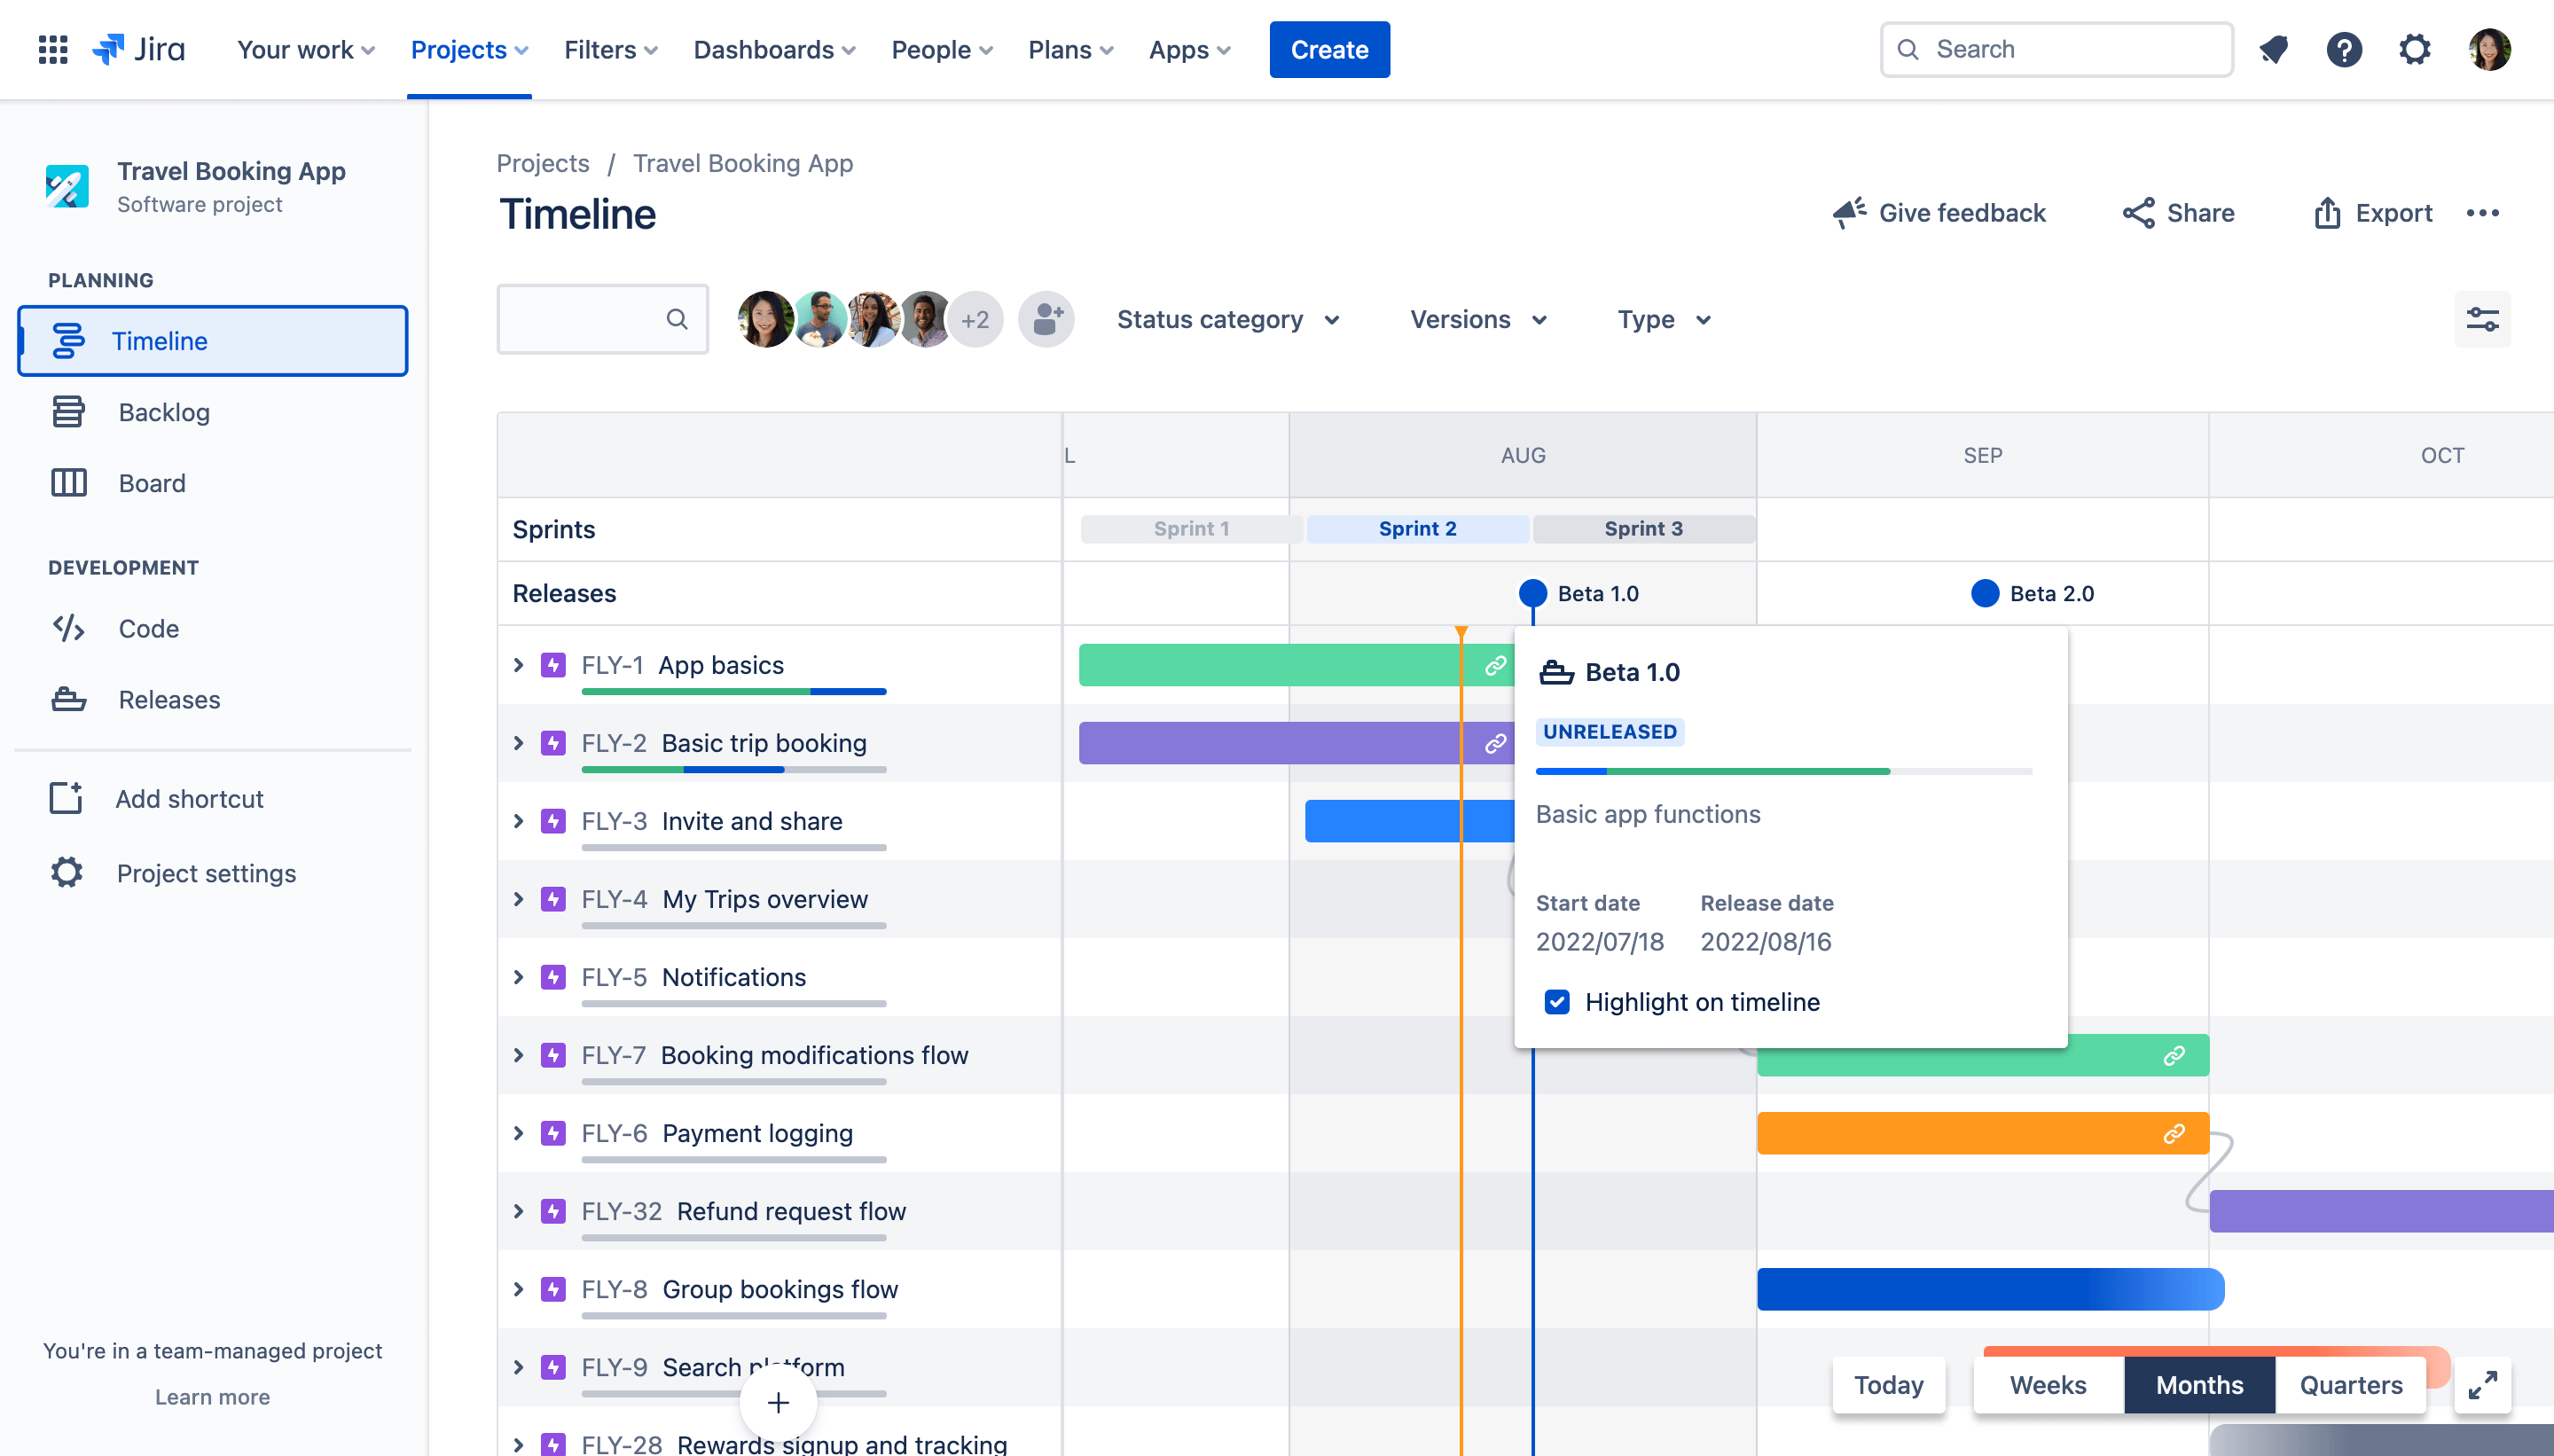
Timeline
The timeline view in Jira brings your issues and releases into a single place where you can plan deliverables, track progress, and share updates with stakeholders. Once you’ve configured your timeline to show Releases, you will be able to see scheduled releases along the timeline and access important details about each release directly in the timeline view.
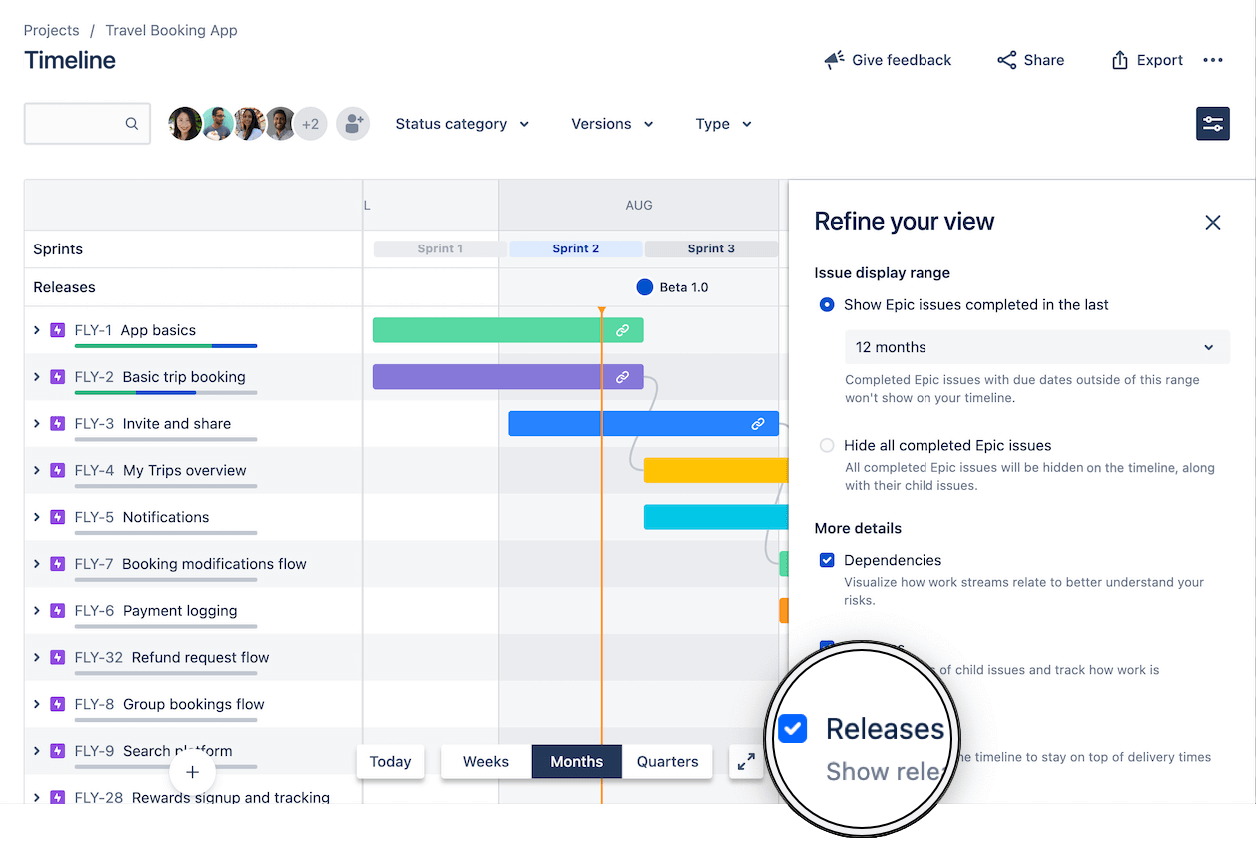
To show releases on your timeline:
Click View settings on the top right corner of your timeline
Check the box next to Releases
To plan and track releases on your timeline:
When planning future releases or tracking a release in progress, you can quickly determine the status of each release based on the release icon:
a. A blue circle indicates the release is
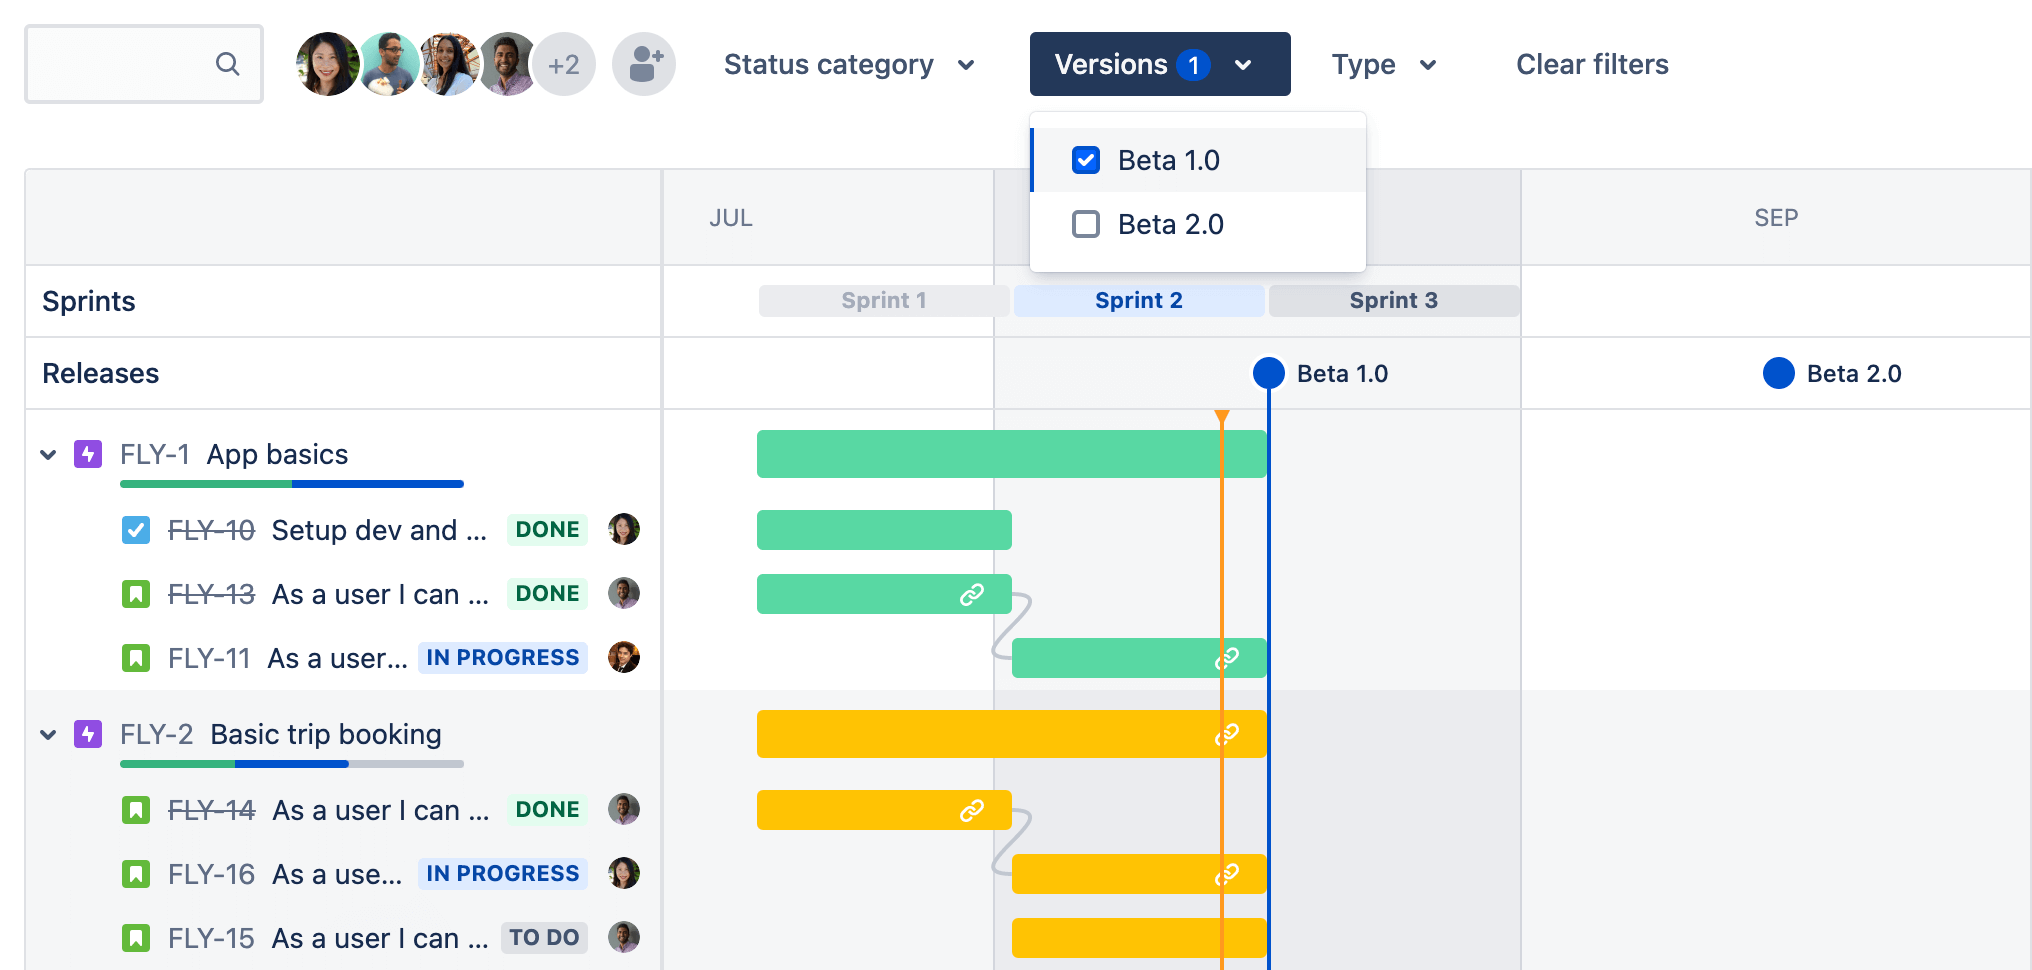
UNRELEASEDand has not passed its release date b. A red circle with an exclamation point indicates the release isUNRELEASEDand overdue c. A green circle with a checkmark indicates the release has beenRELEASEDUse the Versions filter to display only the issues related to the selected release(s) on the timeline. This allows you to see all the work items related to a specific deliverable scheduled over time.
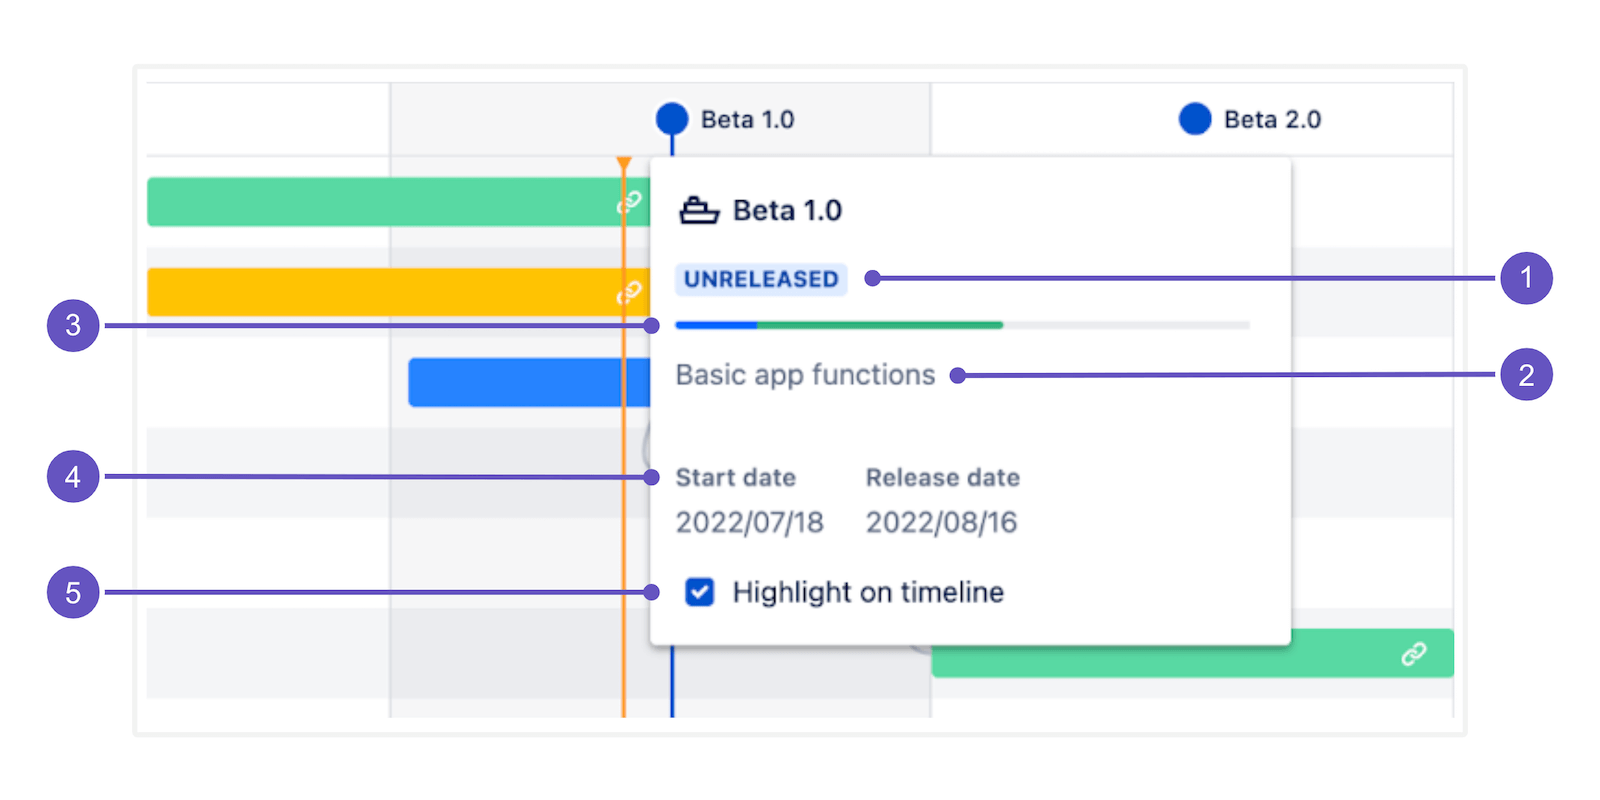
Click on any release icon to view important details such as progress, dates, and description. Optionally, check the box next to Highlight on timeline to visualize the release date on your timeline. This allows you to see how a specific deliverable is tracking towards its release date.
1. Release status: this appears as
UNRELEASED,RELEASED, orARCHIVED.2. Release description: this describes the deliverables in your release and can be added upon release creation or edited in the Releases tab.
3. Release progress bar: this reflects the statuses of issues assigned to the release and will automatically update as issue statuses change.
4. Start date and release dates: the start and release dates scheduled for your release which can be edited in the Releases tab.
5. Option to highlight release date on the timeline (shown as vertical blue line)
The release hub
The release hub provides a place for you to manage all your releases. It also gives you information on the status of your releases, and a breakdown of the number of issues in each version.
To navigate to the release hub:
Go to your project.
In the project menu, select Releases.
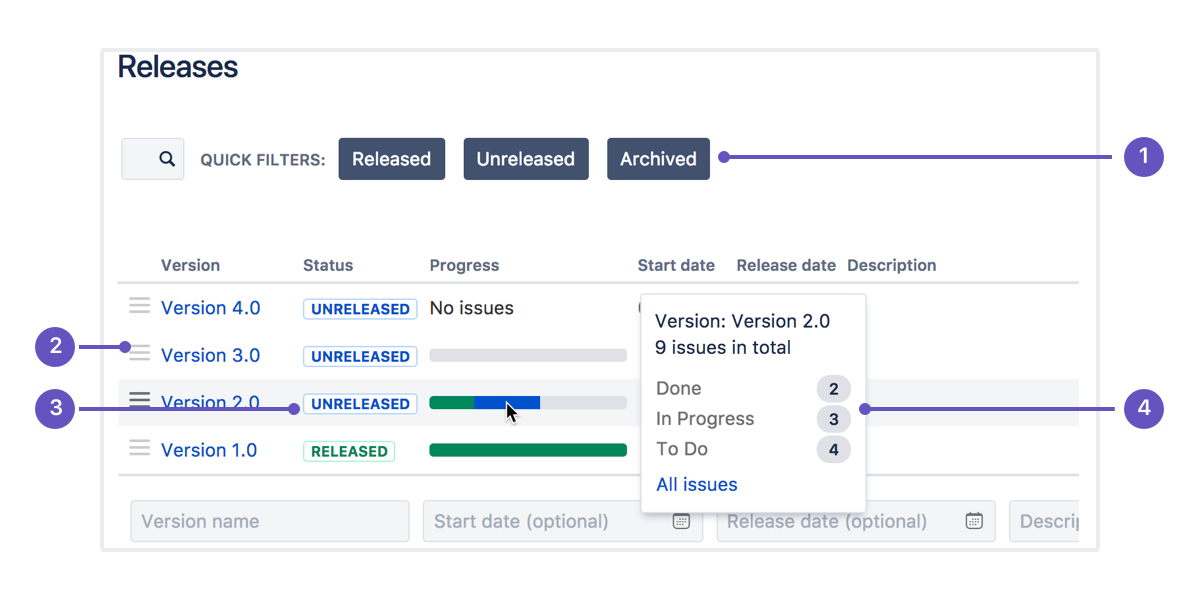
1. Quick filters: Focus on specific versions by filtering out the ones you aren't interested in.
2. Version list: Drag and drop versions to reorder them.
3. Status: Versions can have one of three statuses:
UNRELEASED,RELEASED, orARCHIVED.4. Progress: This shows how many issues have been assigned to the version, and how many are in each status.
Want more information to help you monitor your releases?
If you integrate Jira with your Bitbucket repository, you'll also see development information here relating to your commits, branches, and pull requests.
Release Burndown report (Scrum only)
The release burndown report shows how much work has been completed, and the total work remaining. Burndown charts are used to predict your team's likelihood of completing their work in the time available. They're also great for keeping the team aware of any scope creep that occurs.
Note that to use the release burndown chart, you'll need to estimate your issues. For more information, check out our guide on burndown charts.
To view the release burndown report:
Navigate to your project.
In the project menu, select Reports.
Select the Release Burndown.
Release menu: Select which release to view data for.
Work added: The dark blue segment shows the amount of work added to the release in each sprint. In this example, work is measured in story points.
Work remaining: The light blue segment shows the amount of work remaining in the release.
Work completed: The green segment represents how much work is completed for the release in each sprint.
Projected completion: The report projects how many sprints it will take to complete the release, based on the team's velocity.
For more in-depth information, check out our release burndown chart documentation.
Step 4: Complete a version
It's time to turn your team's hard work into a software release. By this stage, you should be confident that your version is ready to be released — issues are complete, code is checked in, reviewed, and merged, builds are passing, etc.
To deploy a release, you would typically release the version in Jira, build the release, then deploy the release to the required environment.
To complete a version
Navigate to your project.
In the project menu, select Releases.
For the version you want to release, select Actions (•••) > Release.
On Kanban boards, you can also release all issues in the Done column as a new version directly from the board itself.
Versions and Jira automation
You can use automation to supercharge how you use versions in Jira. See this automation rule and 100s more in the Jira Automation Template Library. Go to library
What to learn more?
For more detailed information on working with versions in Jira, check out our versions documentation.
Have questions? Ask the Atlassian Community.
- The Agile Coach
- Agile Manifesto
Agile project management
- Overview
- Project management intro
- Workflow
- Epics, stories, themes
- Epics
- User Stories
- Estimation
- Metrics
- Gantt chart
- Program management vs. project management
- Project baseline
- Continuous improvement
- Lean principles
- 3 pillars of Scrum
- Scrum Board
- Waterfall Methodology
- Velocity in Scrum
- What is Definition of Ready
- Lean vs. agile
- Scrumban
- Lean Methodology
- Sprint backlog
- Burn up chart
- 4 kanban principles
- 4 kanban metrics
- Program vs. Project Manager
- Gantt chart examples
- Definition of done
- Backlog grooming
- Lean process improvement
- Backlog refinement meetings
- Scrum values
- Scope of work
- Scrum tools
- Tools
- Workflow automation software
- Templates
- Task tracker
- Workflow automation
- Status report
- Workflow chart
- Project roadmap
- Project schedule
- Tracking software
- Roadmap tools
- Technology roadmap
- Project scheduling software
- Backlog management tools
- Understanding workflow management strategies
- Workflow examples
- Create project roadmap
- Sprint planning tools
- Sprint demo
- Project Timeline Software
- Top task management tools
- Product backlog vs. sprint backlog
- Top workflow management tools
- Project dependencies
- Task dashboard guide
- Sprint cadence
- Fast tracking
Product Management
- Overview
- Product Roadmaps
- Product Manager
- Tips for new product managers
- Roadmaps
- Tips for presenting product roadmaps
- Requirements
- Product analytics
- Product development
- Remote product management
- Minimal viable product
- Product discovery
- Product specification
- Product development strategy
- Product development software
- New product development process
- Product management KPIs
- Net Promoter Score (NPS)
- Product critique
- Prioritization frameworks
- Product features
- Product management tools
- Product Lifecycle Management
- 9 best roadmap software for teams
- Product launch checklist
- Product strategy
- Product engineering
- Product operations
- Portfolio management
- AI and product management
- Growth product management
- Product metrics
- Product release
- Feature request
- Product launch
- Product planning
- Product launch event
- Value Stream Management
- DevOps
Agile tutorials
- Overview
- Jira and Confluence sprint refinement
- How to do scrum with Jira
- Learn kanban with Jira
- Learn how to use Epics in Jira
- Learn how to create an agile board in Jira
- Learn how to use sprints in Jira
- Learn Versions with Jira
- Learn Issues with Jira
- Learn burndown charts with Jira
- Auto-create sub-tasks and update fields in Jira
- How to automatically assign issues with Jira Automation
- How to sync epics stories with Jira Automation
- Automatically escalate overdue issues in Jira
About the Agile Coach
- All articles
Learn how to use versions in Jira
The guide to using versions in Jira
By Max Rehkopf
By Max Rehkopf
As a self-proclaimed “chaos muppet” I look to agile practices and lean principles to bring order to my everyday. It’s a joy of mine to share these lessons with others through the many articles, talks, and videos I make for Atlassian
Get started for free with Jira
Jira Versions Tutorial
In this tutorial, we'll explain how to work with versions in Jira.
TIME
10 minute read. Complete over 2 weeks or more.
AUDIENCE
You're familiar with how Scrum and/or Kanban work in Jira
You have the Administer Projects permission for all projects on your Scrum or Kanban board. See Managing project permissions for more info.
PREREQUISITE
You've created a Jira account
You've created a Jira Scrum or Kanban project
You've filled your project with issues
You’ve enabled the Releases feature under your Project settings
What is a version in Jira?
In Jira, versions represent points-in-time for a project. They help you organize your work by giving you milestones to aim for. You can assign issues in your project to a specific version, and organize your sprints around completing work in that version.
Step 1: Create a version in Jira
Navigate to your project.
In the project menu, click on Releases.
Click on Create version.
Select the Name text box and enter a name. Optionally, schedule a Start date and/or Release date, or add a Description of this version. Click Save.Version names are typically numeric, for example, 1.0 or 2.1.1. You could also consider using an internal codename.
How many versions should I create?
You can create as many as you think is necessary. For example, you might create several versions, to plan ahead. Or you might just have one or two versions for now.
Once you create a version, the Affects version and Fix version fields will become available on your issues.
Affects version is the version in which a bug or problem was found. Although it can be useful for tracking problems, it isn't used very often in Jira.
Fix version is the version where you plan on releasing a feature or bugfix to customers. This field is used for release planning, monitoring progress and velocity, and is used widely in reporting. This is most likely the field you want.
Step 2: Add issues to version
If your project has a backlog
Navigate to the project Backlog.
Open the Versions panel on the left.
Drag an issue to the version you want to add it to.
If your project doesn't have a backlog
Open the issue you want to add to a version.
Find the Fix version/s field, and enter the version you want to add the issue to.
Step 3: Monitoring the progress of a version
Jira gives you many tools you can use to check the progress of a version. We'll discuss a few of them here.
Timeline
The timeline view in Jira brings your issues and releases into a single place where you can plan deliverables, track progress, and share updates with stakeholders. Once you’ve configured your timeline to show Releases, you will be able to see scheduled releases along the timeline and access important details about each release directly in the timeline view.
To show releases on your timeline:
Click View settings on the top right corner of your timeline
Check the box next to Releases
To plan and track releases on your timeline:
When planning future releases or tracking a release in progress, you can quickly determine the status of each release based on the release icon:
a. A blue circle indicates the release is
UNRELEASEDand has not passed its release date b. A red circle with an exclamation point indicates the release isUNRELEASEDand overdue c. A green circle with a checkmark indicates the release has beenRELEASEDUse the Versions filter to display only the issues related to the selected release(s) on the timeline. This allows you to see all the work items related to a specific deliverable scheduled over time.
Click on any release icon to view important details such as progress, dates, and description. Optionally, check the box next to Highlight on timeline to visualize the release date on your timeline. This allows you to see how a specific deliverable is tracking towards its release date.
1. Release status: this appears as
UNRELEASED,RELEASED, orARCHIVED.2. Release description: this describes the deliverables in your release and can be added upon release creation or edited in the Releases tab.
3. Release progress bar: this reflects the statuses of issues assigned to the release and will automatically update as issue statuses change.
4. Start date and release dates: the start and release dates scheduled for your release which can be edited in the Releases tab.
5. Option to highlight release date on the timeline (shown as vertical blue line)
The release hub
The release hub provides a place for you to manage all your releases. It also gives you information on the status of your releases, and a breakdown of the number of issues in each version.
To navigate to the release hub:
Go to your project.
In the project menu, select Releases.
1. Quick filters: Focus on specific versions by filtering out the ones you aren't interested in.
2. Version list: Drag and drop versions to reorder them.
3. Status: Versions can have one of three statuses:
UNRELEASED,RELEASED, orARCHIVED.4. Progress: This shows how many issues have been assigned to the version, and how many are in each status.
Want more information to help you monitor your releases?
If you integrate Jira with your Bitbucket repository, you'll also see development information here relating to your commits, branches, and pull requests.
Release Burndown report (Scrum only)
The release burndown report shows how much work has been completed, and the total work remaining. Burndown charts are used to predict your team's likelihood of completing their work in the time available. They're also great for keeping the team aware of any scope creep that occurs.
Note that to use the release burndown chart, you'll need to estimate your issues. For more information, check out our guide on burndown charts.
To view the release burndown report:
Navigate to your project.
In the project menu, select Reports.
Select the Release Burndown.
Release menu: Select which release to view data for.
Work added: The dark blue segment shows the amount of work added to the release in each sprint. In this example, work is measured in story points.
Work remaining: The light blue segment shows the amount of work remaining in the release.
Work completed: The green segment represents how much work is completed for the release in each sprint.
Projected completion: The report projects how many sprints it will take to complete the release, based on the team's velocity.
For more in-depth information, check out our release burndown chart documentation.
Step 4: Complete a version
It's time to turn your team's hard work into a software release. By this stage, you should be confident that your version is ready to be released — issues are complete, code is checked in, reviewed, and merged, builds are passing, etc.
To deploy a release, you would typically release the version in Jira, build the release, then deploy the release to the required environment.
To complete a version
Navigate to your project.
In the project menu, select Releases.
For the version you want to release, select Actions (•••) > Release.
On Kanban boards, you can also release all issues in the Done column as a new version directly from the board itself.
Versions and Jira automation
You can use automation to supercharge how you use versions in Jira. See this automation rule and 100s more in the Jira Automation Template Library. Go to library
What to learn more?
For more detailed information on working with versions in Jira, check out our versions documentation.
Have questions? Ask the Atlassian Community.
Recommended for you
Templates
Ready-made Jira templates
Browse our library of custom Jira templates for various teams, departments, and workflows.
Product guide
A comprehensive introduction to Jira
Use this step-by-step guide to discover essential features and the best practices to maximize your productivity.
Git Guide
Understanding the Basics of Git
From beginners to advanced experts, use this guide to Git to learn the basics with helpful tutorials and tips.