- The Agile Coach
- Agile Manifesto
Agile project management
- Overview
- Project management intro
- Workflow
- Epics, stories, themes
- Epics
- User Stories
- Estimation
- Metrics
- Gantt chart
- Program management vs. project management
- Project baseline
- Continuous improvement
- Lean principles
- 3 pillars of Scrum
- Scrum Board
- Waterfall Methodology
- Velocity in Scrum
- What is Definition of Ready
- Lean vs. agile
- Scrumban
- Lean Methodology
- Sprint backlog
- Burn up chart
- 4 kanban principles
- 4 kanban metrics
- Program vs. Project Manager
- Gantt chart examples
- Definition of done
- Backlog grooming
- Lean process improvement
- Backlog refinement meetings
- Scrum values
- Scope of work
- Scrum tools
- Tools
- Workflow automation software
- Templates
- Task tracker
- Workflow automation
- Status report
- Workflow chart
- Project roadmap
- Project schedule
- Tracking software
- Roadmap tools
- Technology roadmap
- Project scheduling software
- Backlog management tools
- Understanding workflow management strategies
- Workflow examples
- Create project roadmap
- Sprint planning tools
- Sprint demo
- Project Timeline Software
- Top task management tools
- Product backlog vs. sprint backlog
- Top workflow management tools
- Project dependencies
- Task dashboard guide
- Sprint cadence
- Fast tracking
Product Management
- Overview
- Product Roadmaps
- Product Manager
- Tips for new product managers
- Roadmaps
- Tips for presenting product roadmaps
- Requirements
- Product analytics
- Product development
- Remote product management
- Minimal viable product
- Product discovery
- Product specification
- Product development strategy
- Product development software
- New product development process
- Product management KPIs
- Net Promoter Score (NPS)
- Product critique
- Prioritization frameworks
- Product features
- Product management tools
- Product Lifecycle Management
- 9 best roadmap software for teams
- Product launch checklist
- Product strategy
- Product engineering
- Product operations
- Portfolio management
- AI and product management
- Growth product management
- Product metrics
- Product release
- Feature request
- Product launch
- Product planning
- Product launch event
- Value Stream Management
- DevOps
Agile tutorials
- Overview
- Jira and Confluence sprint refinement
- How to do scrum with Jira
- Learn kanban with Jira
- Learn how to use Epics in Jira
- Learn how to create an agile board in Jira
- Learn how to use sprints in Jira
- Learn Versions with Jira
- Learn Issues with Jira
- Learn burndown charts with Jira
- Auto-create sub-tasks and update fields in Jira
- How to automatically assign issues with Jira Automation
- How to sync epics stories with Jira Automation
- Automatically escalate overdue issues in Jira
About the Agile Coach
- All articles
How to automatically assign issues with Jira Automation

By Kev Zettler
By Kev Zettler
Kev is a lead full stack web developer and serial entrepreneur with over a decade of experience building products and teams with agile methodologies. He is a passionate contributor, author, and educator on emerging open source technologies like DevOps, cryptocurrency, and VR/AR. In his free time, he participates in indie game development jams.
You can create a Jira automation rule by using an if/else condition, which automatically assigns issues to groups of users based on their issue types.
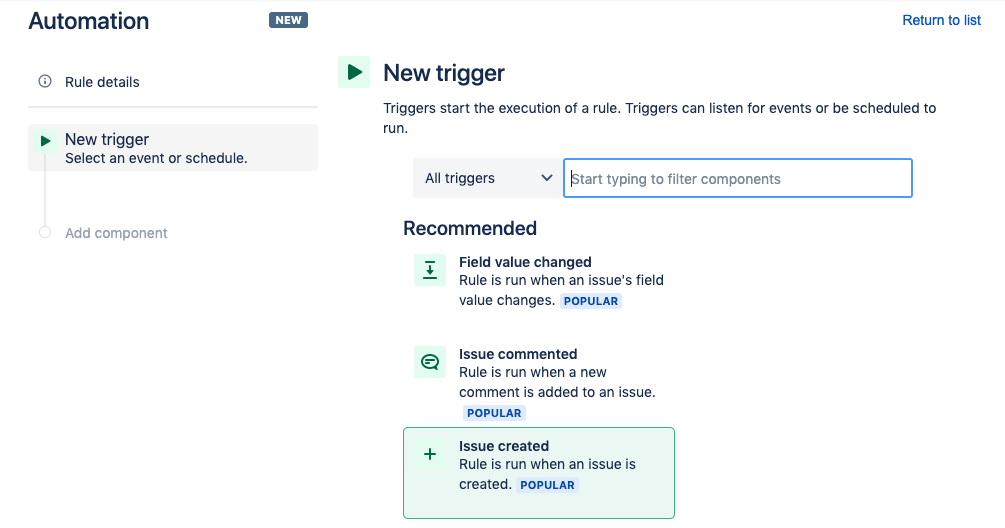
Navigate to the Automation tab of your project settings in Jira. In the rules tab, click on Create rule in the top right corner of the screen. On the New trigger screen select Issue created and click Save.
On the Add component screen, click New condition.
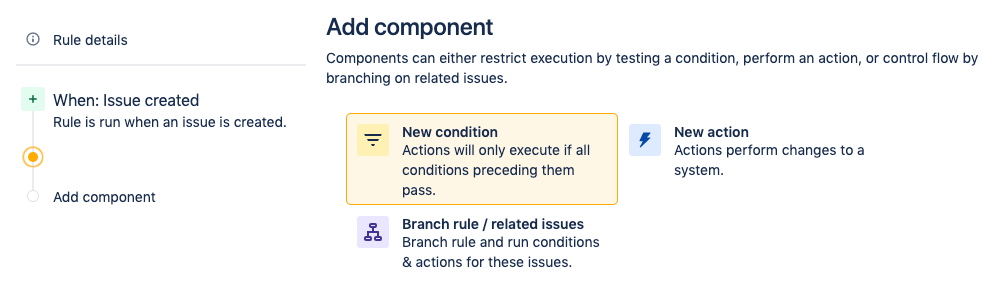
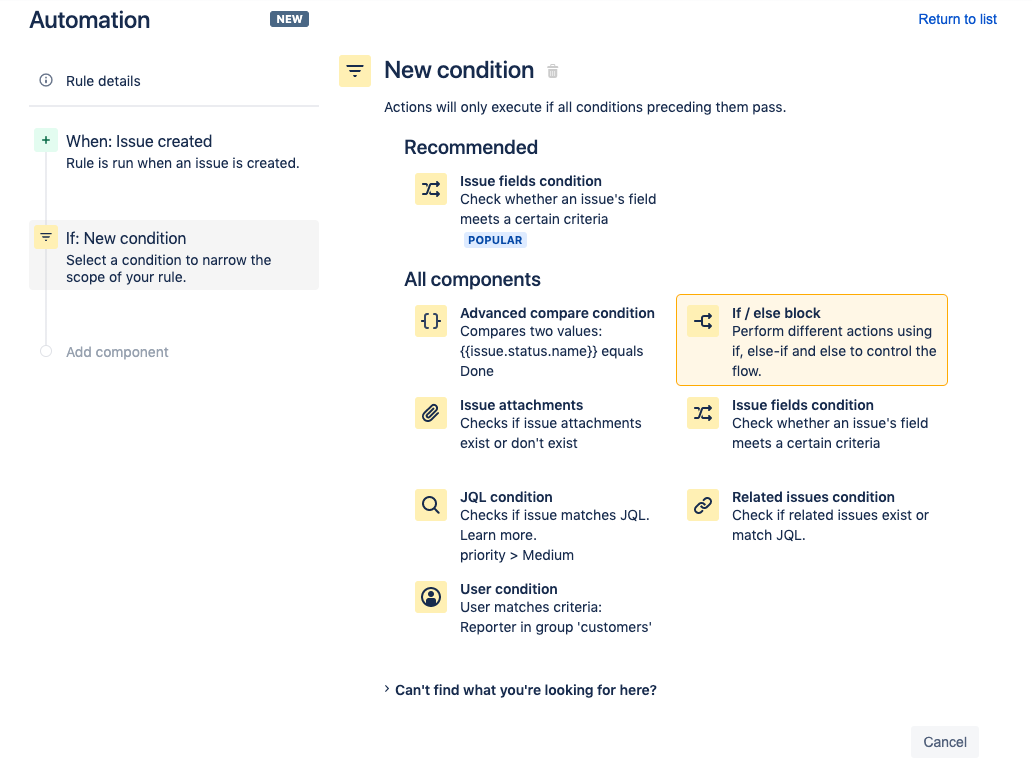
On the New condition screen select the if/else block option. This creates a condition that initiates an action depending on criteria in the automation rule.
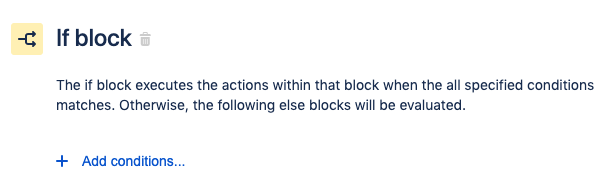
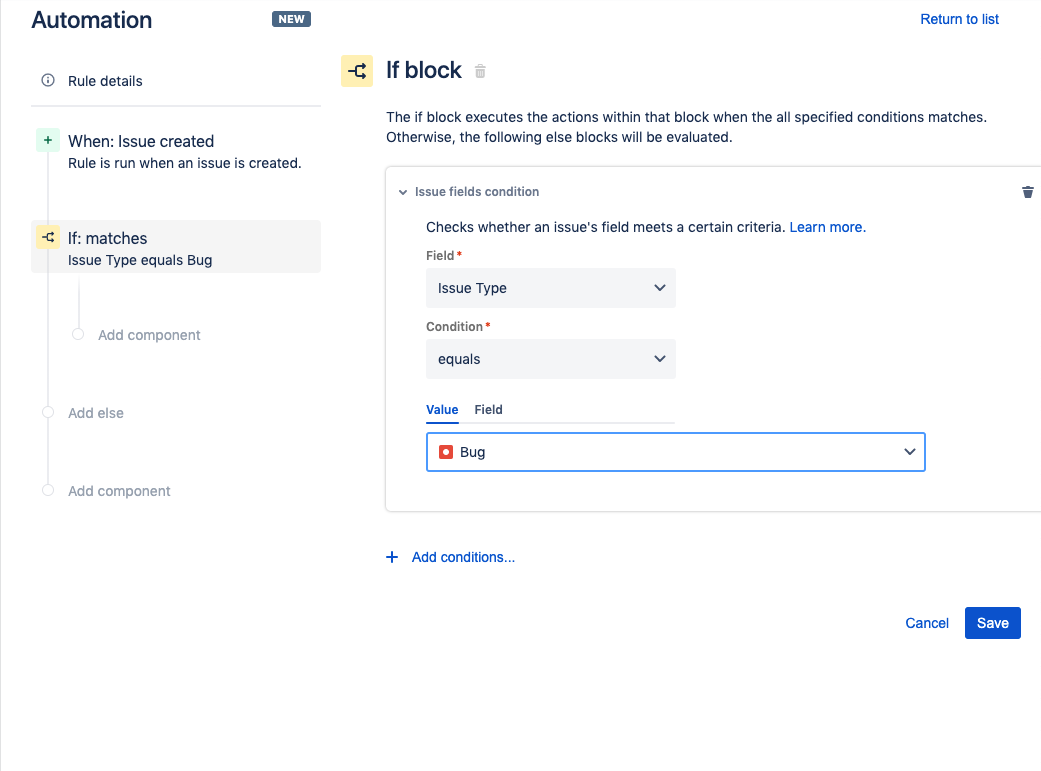
On the If block screen, click Add Conditions...
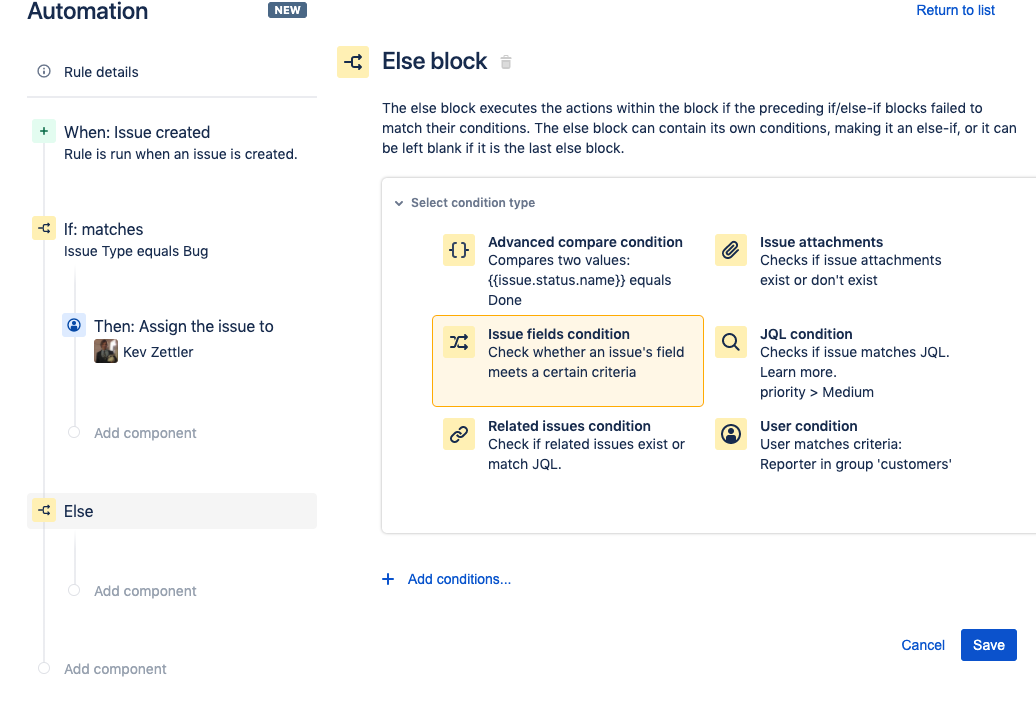
In the If Block screen, select the Issue fields condition option.

For this demo we set the condition for Issue Type > equals > Bug. Be sure to click Save.
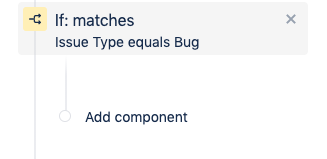
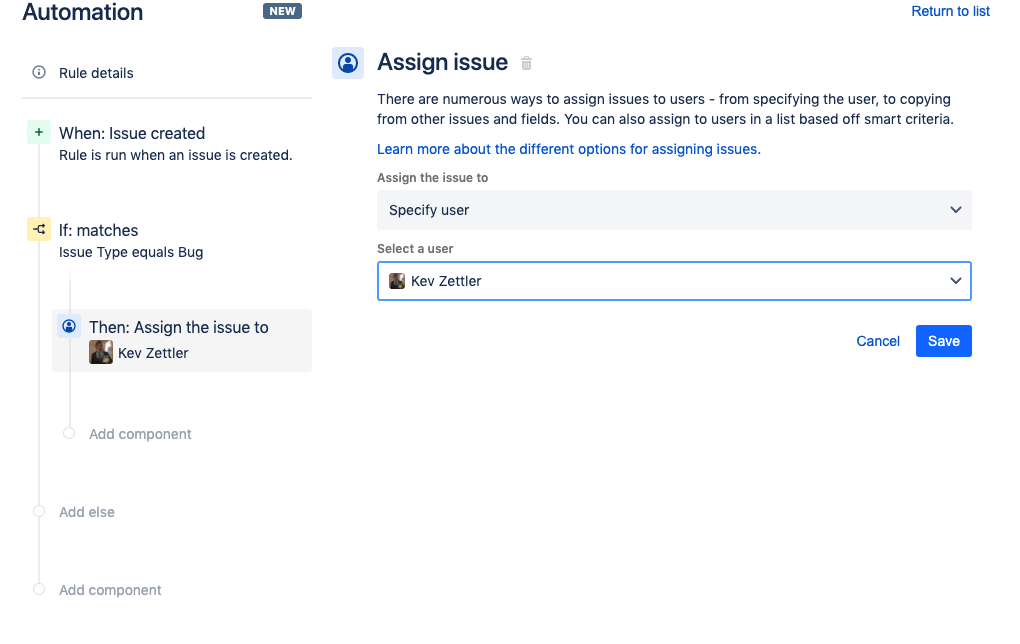
Next, add an action that assigns bugs to a certain group of users. On the left sidebar, which has a summary of the automation rule, click the Add component text underneath the If:matches condition.
You will be prompted for a New component. Click New Action.
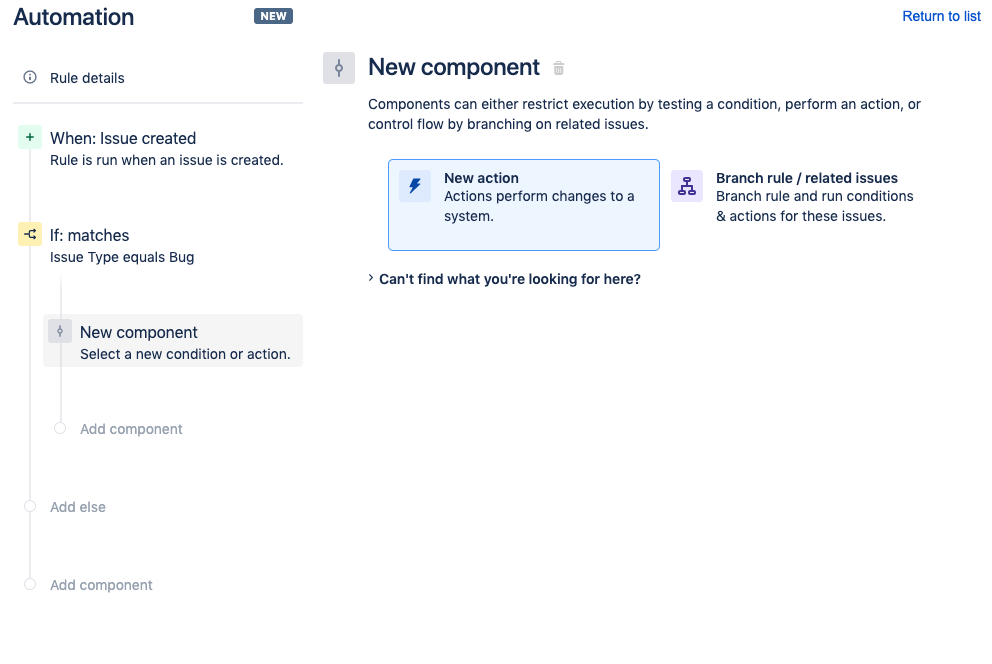
On the New Action screen search for and click the Assign issue option.
From the Assign issue prompt, select a user who will be assigned issues. Click the Save button.
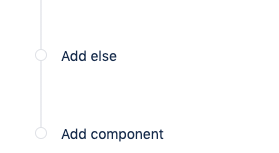
Next you can add an if/else condition to the If:matches condition. If the condition in the If block does not match, then the rule will evaluate the Else block. Click on the Add else text on the left sidebar.
You will be brought to the Else block screen. Click the Add conditions text and select another Issue fields condition.
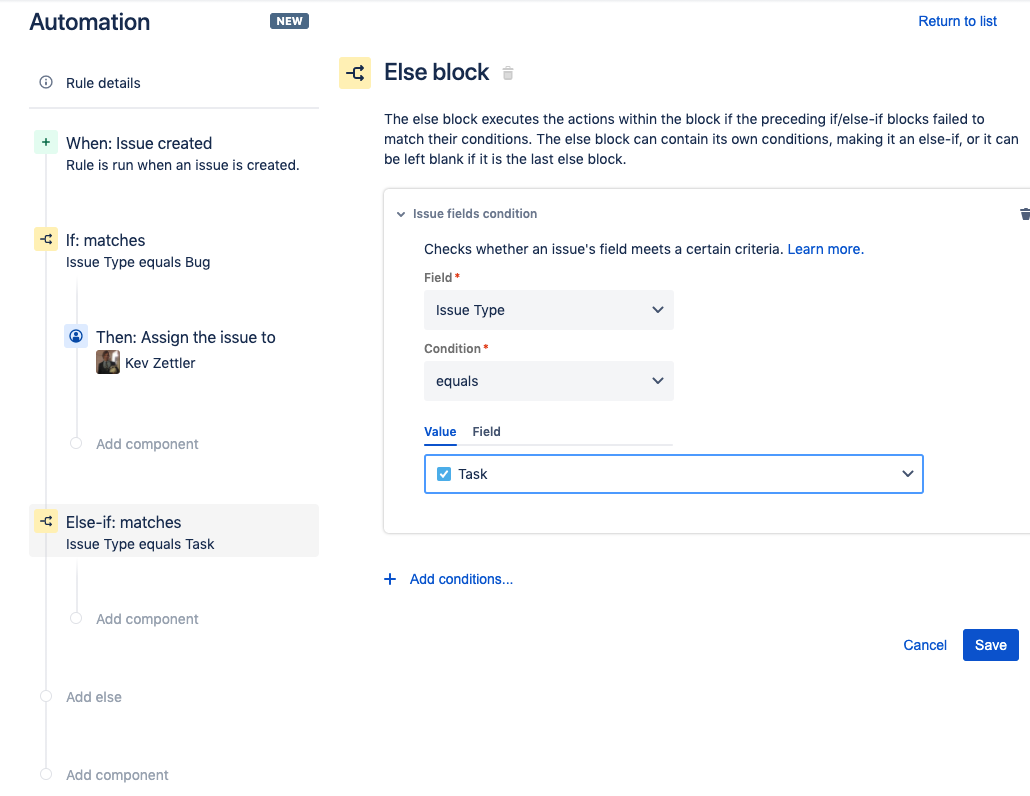
Add a new condition to the Else-if block. The example below demonstrates how to add a new Else-if condition that is activated when the issues type value equals Task.
Repeat the steps to add an action to the Else-if condition. The example below illustrates how to create an additional action that assigns the issue to another user.
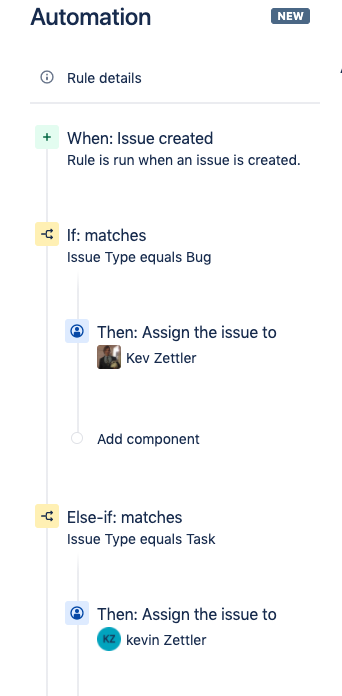
This rule has If and Else-if conditions that checks for a certain type of issue so that subsequent actions are performed once either condition matches. Next, fill in the remaining Else condition with another action. Click on the add else text located on the rule details sidebar then click the Save button. Repeat the above steps for adding an Assign issue action to the new Else condition.
The example below reveals how to set the Assign issue action to automatically assign the issue to a user in a list.
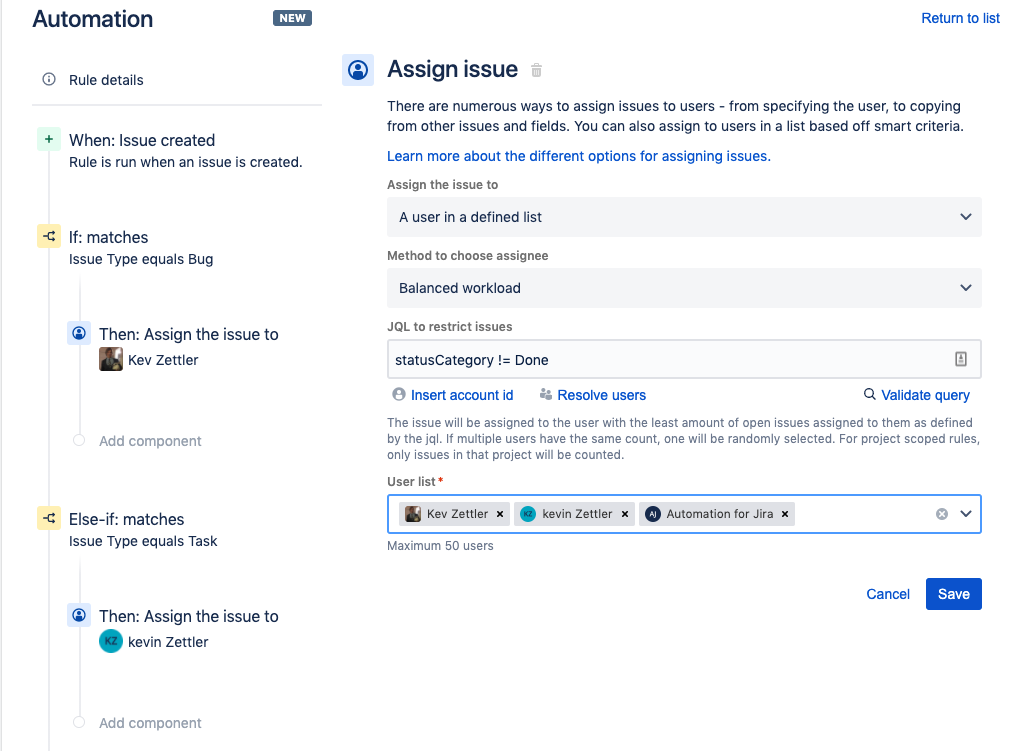
This Assign issue demonstrates the Balanced workload assignment that automatically assigns the issue to users in the list. The Balanced workload assignment evenly distributes assignments so that a user in the list is not assigned more issues than the others. Once you configure the new Assign issue action, click the Save button.
The following screenshot details what the final rule details should look like: It should include:
1 Trigger - When: Issue created
3 Conditions - If:matches, Else-if:matches, Else
3 actions - Then:Assign the issue to x 3
Next, set a name for the rule and click the Turn it on button. In the example below, we used the name “Auto assign issues by type”. You should see the following success indicator.

Now that the rule has been enabled you can trigger it by creating some issues within your project. Try creating a Bug or Task type issue. You can then verify that the automation rule is functioning successfully by visiting the Audit log.
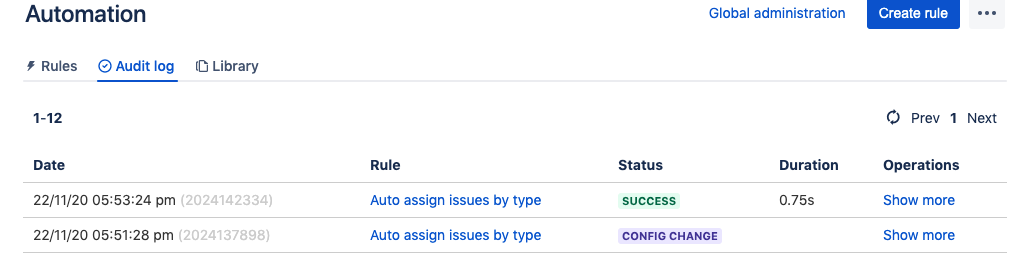
The Audit Log will show you the history of the automation rule from its creation and execution. If there are any issues or bugs with the automation rule, the Audit Log will highlight them and offer debugging support. If you would like to explore other examples of rules, head over to our rule template library.
- The Agile Coach
- Agile Manifesto
Agile project management
- Overview
- Project management intro
- Workflow
- Epics, stories, themes
- Epics
- User Stories
- Estimation
- Metrics
- Gantt chart
- Program management vs. project management
- Project baseline
- Continuous improvement
- Lean principles
- 3 pillars of Scrum
- Scrum Board
- Waterfall Methodology
- Velocity in Scrum
- What is Definition of Ready
- Lean vs. agile
- Scrumban
- Lean Methodology
- Sprint backlog
- Burn up chart
- 4 kanban principles
- 4 kanban metrics
- Program vs. Project Manager
- Gantt chart examples
- Definition of done
- Backlog grooming
- Lean process improvement
- Backlog refinement meetings
- Scrum values
- Scope of work
- Scrum tools
- Tools
- Workflow automation software
- Templates
- Task tracker
- Workflow automation
- Status report
- Workflow chart
- Project roadmap
- Project schedule
- Tracking software
- Roadmap tools
- Technology roadmap
- Project scheduling software
- Backlog management tools
- Understanding workflow management strategies
- Workflow examples
- Create project roadmap
- Sprint planning tools
- Sprint demo
- Project Timeline Software
- Top task management tools
- Product backlog vs. sprint backlog
- Top workflow management tools
- Project dependencies
- Task dashboard guide
- Sprint cadence
- Fast tracking
Product Management
- Overview
- Product Roadmaps
- Product Manager
- Tips for new product managers
- Roadmaps
- Tips for presenting product roadmaps
- Requirements
- Product analytics
- Product development
- Remote product management
- Minimal viable product
- Product discovery
- Product specification
- Product development strategy
- Product development software
- New product development process
- Product management KPIs
- Net Promoter Score (NPS)
- Product critique
- Prioritization frameworks
- Product features
- Product management tools
- Product Lifecycle Management
- 9 best roadmap software for teams
- Product launch checklist
- Product strategy
- Product engineering
- Product operations
- Portfolio management
- AI and product management
- Growth product management
- Product metrics
- Product release
- Feature request
- Product launch
- Product planning
- Product launch event
- Value Stream Management
- DevOps
Agile tutorials
- Overview
- Jira and Confluence sprint refinement
- How to do scrum with Jira
- Learn kanban with Jira
- Learn how to use Epics in Jira
- Learn how to create an agile board in Jira
- Learn how to use sprints in Jira
- Learn Versions with Jira
- Learn Issues with Jira
- Learn burndown charts with Jira
- Auto-create sub-tasks and update fields in Jira
- How to automatically assign issues with Jira Automation
- How to sync epics stories with Jira Automation
- Automatically escalate overdue issues in Jira
About the Agile Coach
- All articles
Automatically assign created issues based on criteria in Jira
By Kev Zettler
By Kev Zettler
Kev is a lead full stack web developer and serial entrepreneur with over a decade of experience building products and teams with agile methodologies. He is a passionate contributor, author, and educator on emerging open source technologies like DevOps, cryptocurrency, and VR/AR. In his free time, he participates in indie game development jams.
You can create a Jira automation rule by using an if/else condition, which automatically assigns issues to groups of users based on their issue types.
Navigate to the Automation tab of your project settings in Jira. In the rules tab, click on Create rule in the top right corner of the screen. On the New trigger screen select Issue created and click Save.
On the Add component screen, click New condition.
On the New condition screen select the if/else block option. This creates a condition that initiates an action depending on criteria in the automation rule.
On the If block screen, click Add Conditions...
In the If Block screen, select the Issue fields condition option.
For this demo we set the condition for Issue Type > equals > Bug. Be sure to click Save.
Next, add an action that assigns bugs to a certain group of users. On the left sidebar, which has a summary of the automation rule, click the Add component text underneath the If:matches condition.
You will be prompted for a New component. Click New Action.
On the New Action screen search for and click the Assign issue option.
From the Assign issue prompt, select a user who will be assigned issues. Click the Save button.
Next you can add an if/else condition to the If:matches condition. If the condition in the If block does not match, then the rule will evaluate the Else block. Click on the Add else text on the left sidebar.
You will be brought to the Else block screen. Click the Add conditions text and select another Issue fields condition.
Add a new condition to the Else-if block. The example below demonstrates how to add a new Else-if condition that is activated when the issues type value equals Task.
Repeat the steps to add an action to the Else-if condition. The example below illustrates how to create an additional action that assigns the issue to another user.
This rule has If and Else-if conditions that checks for a certain type of issue so that subsequent actions are performed once either condition matches. Next, fill in the remaining Else condition with another action. Click on the add else text located on the rule details sidebar then click the Save button. Repeat the above steps for adding an Assign issue action to the new Else condition.
The example below reveals how to set the Assign issue action to automatically assign the issue to a user in a list.
This Assign issue demonstrates the Balanced workload assignment that automatically assigns the issue to users in the list. The Balanced workload assignment evenly distributes assignments so that a user in the list is not assigned more issues than the others. Once you configure the new Assign issue action, click the Save button.
The following screenshot details what the final rule details should look like: It should include:
1 Trigger - When: Issue created
3 Conditions - If:matches, Else-if:matches, Else
3 actions - Then:Assign the issue to x 3
Next, set a name for the rule and click the Turn it on button. In the example below, we used the name “Auto assign issues by type”. You should see the following success indicator.
Now that the rule has been enabled you can trigger it by creating some issues within your project. Try creating a Bug or Task type issue. You can then verify that the automation rule is functioning successfully by visiting the Audit log.
The Audit Log will show you the history of the automation rule from its creation and execution. If there are any issues or bugs with the automation rule, the Audit Log will highlight them and offer debugging support. If you would like to explore other examples of rules, head over to our rule template library.
Recommended for you
Templates
Ready-made Jira templates
Browse our library of custom Jira templates for various teams, departments, and workflows.
Product guide
A comprehensive introduction to Jira
Use this step-by-step guide to discover essential features and the best practices to maximize your productivity.
Git Guide
Understanding the Basics of Git
From beginners to advanced experts, use this guide to Git to learn the basics with helpful tutorials and tips.